CCR
uses the same continuous replication technology that we see in LCR;
however, it performs the failover automatically. It does this through
cluster services that we have to install and configure. Then we need to
install the active and passive mailbox roles. Essentially, this is the
process involved with CCR:
First,
begin with two systems with either Server 2003 or 2008 installed on
them. You must use the Enterprise Edition because cluster services work
only on that edition of Server. Ensure that neither has Exchange 2007
Server installed. We are installing only the Mailbox roles (active and
passive) on these machines. The systems will need to have a public and
private network connection. The public connection is for users to send
and retrieve email to each other through the servers. The private
connection is for the two servers to be able to speak to one another
through a heartbeat that lets the active and passive roles know the
other is alive and well. When
configuring the cluster, we will set up a two-node cluster. This might
seem like a problem because with only two nodes, there is the chance
for a problem called split brain syndrome.
That is a situation where, for example, the passive system believes the
active has gone down and decides to promote itself as the active
system. However, let’s say the active didn’t go down—the cable
connection is disconnected or something simple. Now you have two active
servers at one time. That is a problem. To resolve this problem, many
clusters use three or more servers. What was needed was a new form of
quorum model, and the Exchange Team decided to use a Majority Node Set
(MNS) quorum. A
quorum is like a referee. The way the MNS quorum works is off a file
share that you can set up anywhere. However, it is recommended you set
it up on a Hub Transport server. The file share acts as a witness
between the two servers because if their heartbeat seems to fail, they
can connect to the file share and confirm that the other server really
is down before the passive takes over as the active.
One aspect of this entire procedure is called the transport dumpster,
which is enabled on the Hub Transport servers when you install CCR.
This helps ensure less mail is lost in the event of a failover. The way
it works is that if the active node fails and the passive takes over,
in the brief time span in which this occurs, data can be lost or in
transit. The most recent mail might be in logs and might not have been
shipped over and replayed in time. So, the Hub Transport servers
maintain a queue of recently delivered mail in an area called the
transport dumpster.
When the passive takes over, it checks the Hub Transport servers for
any items that it doesn’t have. Duplicates are weeded out, but anything
the passive doesn’t have will be added. Note: With SP1, this feature
exists for use with LCR, as well.
Although
LCR remains the same for both Server 2003 and Server 2008, there are
some slight changes between the two for CCR. The reason is that cluster
services receive a slight makeover (and a new name—Failover Clustering)
in Server 2008. Let’s look into configuring both of these, starting
with Server 2003.
Configuring Cluster Services with Server 2003
Keep
in mind that in some of these steps, you are considered capable of
going forward and carrying out the instruction without a step-by-step
aspect to it because it assumes basic networking knowledge. Other parts
walk you through step by step because cluster services is not something
every administrator has the chance to work with.
So to configure cluster services, perform the following:
1. | You
should create a separate account for the cluster services and make that
account a member of the Exchange Server Administrators group or
Exchange Organization Administrators group. The account should also be
put in the local Administrators group for each node.
| 2. | On
a Hub Transport server in the same site as the clustered nodes, create
a folder and give it any name you like (within reason, such as
MNSCluster) and share that folder out on the network. Set the share
permissions to Full Control for the cluster administrators account that
you created.
| 3. | Configure
your network adapters. As mentioned previously, you should have a
public and private connection. It’s recommended, for the sake of
organization, that you properly label these in your Network Connections
so you know which one you are looking at quickly. You want to have
static addresses for both the public and private networks. The private
network needs to use a different IP addressing scheme and Microsoft
recommends the addresses 10.10.10.x for both (you can go with
10.10.10.10 and 10.10.10.11 for the active and passive private
connections). Check your binding order on the network adapters, too (on
the Adapters and Bindings tab of the Advanced Settings for your
connection) and put the Public connection to the top of the binding
order.
| 4. | Before
proceeding, on both nodes of the cluster you want to download and
install KB 921181. This is an update fix that you want to ensure is
installed on these servers. It allows them, as clusters, to use the
file share witness we created earlier and to configure the heartbeats
feature. You should read the KB and then install the hotfix.
|
After your systems are ready, you can perform the following on the active node of the two-node cluster:
1. | Select Start, Administrative Tools, and then Cluster Administrator to open the wizard (or from the command line, type cluster /create/wizard).
| 2. | From the drop-down box, select Create New Cluster and then OK.
| 3. | Read the first page of the wizard, and then click Next.
| 4. | On
the Cluster Name and Domain screen, the Domain is already filled in for
you, but you have to provide a unique name for the cluster. You might
try a name like E2K7Cluster or something similar; it is your choice.
Then click Next.
| 5. | You
are asked to type in the name of the server that will be the first node
of the cluster. You can name your servers something logical like Node1,
Node2, or something similar. Then click Next.
| 6. | The wizard will now analyze the configuration. When it completes, note any warnings and click Next.
| 7. | You
are asked for the IP address that the cluster management tools will use
to connect up to the cluster. This is a public IP address, not a
private one, and you want to ensure it is a unique address on the
system. Then click Next.
| 8. | You
are asked for the Cluster Service Account at this point, and if you
followed the instructions earlier, you should have an account prepared
for handling your cluster services already in place. Fill in that
information and click Next.
| 9. | Here
you are shown the Proposed Cluster Configuration, and here is where you
need to choose the type of quorum. Select the Quorum option, shown in Figure 1. Then select the down arrow, choose Majority Node Set, and click OK.

| 10. | From the Creating the Cluster screen the first node is going to be established. Click Next.
| 11. | At the completion screen, you can view the log of the entire procedure. When you are ready, click Finish.
|
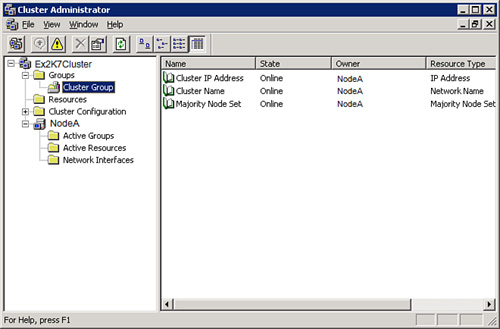
To
confirm the first node of your cluster is up and running, open up
Cluster Administrator and expand the name of your cluster. Then expand
Groups and Cluster Groups and you will hopefully see that your cluster
is online, as you can see in Figure 2.
Having
a cluster with one node is not an effective high-availability solution.
So, we need to add the second node. To do this, perform the following:
1. | Open Cluster Administrator from your cluster tools.
| 2. | Right-click the primary node server name, select New, and then Node. This will start the Add Nodes Wizard. Click Next.
| 3. | Type the name of your second node and click Add. Remember, we are adding only two nodes for our CCR cluster.
| 4. | The wizard will analyze and confirm that everything is in place to form the cluster. When complete, click Next.
| 5. | You
are asked for the cluster service account again, which you should have
in place already. Add that information, and click Next.
| 6. | The
Proposed Cluster Configuration page will display and you can confirm
the setting choices you made. If everything is correct, click Next.
| 7. | After the cluster is complete, click Finish.
|
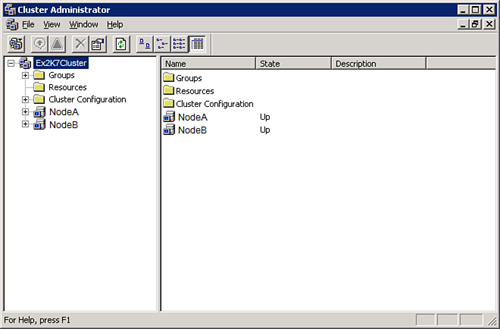
To
confirm that your two-node cluster is up and running, open the Cluster
Administrator and you should see the cluster. You should be able to see
two servers (your Node1 or NodeA and your Node2 or NodeB). You should
see in the State column that they are both Up, as shown in Figure 3.
Note
Another method to confirm that the cluster is up and running is to go to a command prompt and type cluster group or cluster node, and you will see a response regarding your cluster or nodes and the status.
After
your cluster is set, you need to establish the file share you
configured to be your MNS quorum witness. This works if you installed
the hotfix and if the share is correct. To do this you need to go to a
command line and type
Cluster res “Majority Node Set” /priv MNSFileShare=\\servername\sharename
At
this point, you are ready to perform the installation of Exchange 2007
for the Mailbox server roles for the active and passive side.
The installation begins like a typical installation:
1. | Insert
the DVD or mount the ISO for the Installation screen to display. Select
the link from Step 4 to begin the Installation Wizard.
| 2. | You will be taken to the Introduction screen. Select Next.
| 3. | You are taken to the License Agreement screen. Choose I Accept the Terms in the License Agreement, and select Next.
| 4. | You are taken to the Error Reporting screen. Make your choice before selecting Next.
| 5. | This
brings you to the Installation Type screen, where you can choose either
a typical or custom Exchange Server installation. In this case, select
Custom Exchange Server Installation.
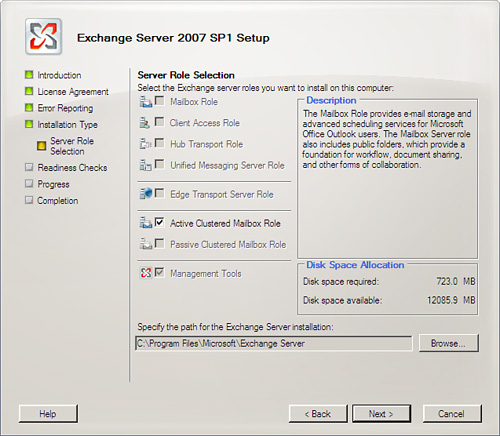
| 6. | Under Server Role Selection, select Active Clustered Mailbox Role, as you can see in Figure 4. The Management Tools are selected by default. Select your options and choose Next.
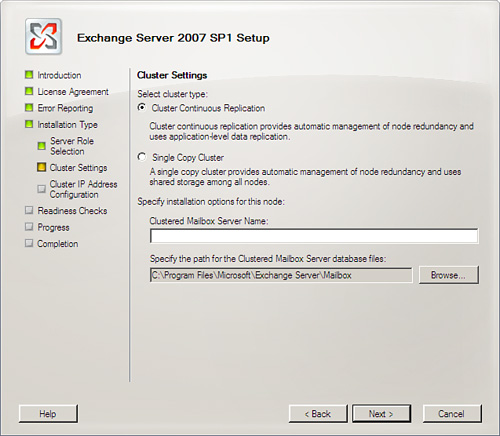
| 7. | Under Cluster Settings, shown in Figure 5,
you want to choose the Cluster Continuous Replication option. You also
need to provide the Clustered Mailbox Server Name (CMS). This is the
name your Outlook clients use to connect to the server. You can alter
the path to the Clustered Mailbox Server database files if you like by
choosing the Browse button. When you are ready, click Next.
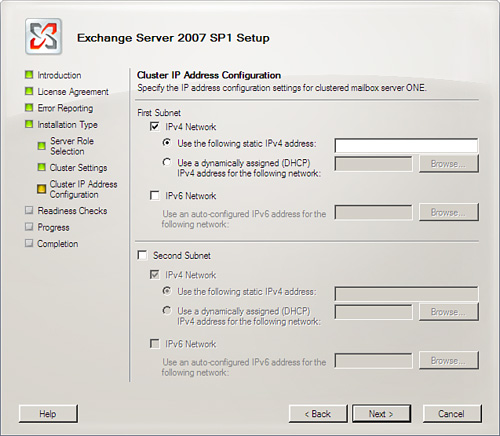
| 8. | On the Cluster IP Address Configuration screen, you have the ability to define more than one subnet, as you can see in Figure 6.
You can determine the use of IPv4, IPv6, or both. (Note that it is
possible to use a DHCP-assigned address, but it is not recommended.)
When complete, click Next.
| 9. | The
Readiness Checks screen checks to make sure your system is ready for
the installation of the server options you’ve chosen. After you are
clear to move forward, choose Install.
| 10. | The
Progress screen walks you through the process of the actual
installation. When complete, it takes you to the Completion screen and
shows you what has been installed successfully. Click Finish.
|
After
you install the active side, the next step is to install the Passive
Clustered Mailbox role. Follow the same steps but choose the passive
mailbox.
|